Total Pageviews

Tuesday, 4 November 2014

Industry | New Project


Today we started a new project on industry, the aim is to get a feel for what it would be like to work for a big fashion house. This project is in groups, each team was given a house in which we had to collection design (and/or) create an A/W collection. My group was given Meadham Kirchhoff, a pair of CSM graduates with an extremely avant garde style. They involved a vintage aspect, but combine it with outrageous colour clashing, cheap materials and over-the-top styling. In addition with producing garments, we aim to create various advertising campaigns, photo-shoots, catwalk ideas, style the designed garments and produce a fashion film. At the end of the two week project we have to present to the rest of the class. 

After teaming up our group deciphered that their work reminded us of the 'walk of shame,' in other words, the morning after the night out. But due to their feminist/punk attitude we decided to turn this on its head and call it the 'Walk of Glory,' emphasising that a woman should be proud and confident in her sexuality and behavior. To turn the word 'slut' into a positive as such. Due to the vintage themes running through Kirchhoff's work, we decided on keeping frills as a cohesive idea. Other brainstorms included; toys, lost boys, girly colours and texture. 

We were given two quotes in which our theme must be based around, we chose words from the first quote and combined them, this included:
"massive gaps"
"broken and rewound"
"not always knowing, and yet always searching"
These collectively fitted well with our pro feminist theme of the 'Walk of Glory,' using the broken and the massive gaps quotes could be literally taken to show the broken texture and construction of the clothes, and the last was related to the literal mind blank from a night before. The drunk connotations of not remembering what happened, but searching for it.

From these quotes I started to research into the muse we were going to be looking at, and other inspiration I got from this quote. I created a few personal mood boards focusing on the themes from 'walk of glory', alongside Meadham Kirchhoff's muse 'Arvida Bystrom', so I could learn more about her and other inspirations they use, for example Vivienne Westwood. Other similar looks and inspirational people I thought to look into included Yolandi Visser, Beth Ditto and Courtney Love. As the brand is quite new, I felt I needed to explore them further to realistically be able to design a collection that would be new, but also fit into their past work. Kirchhoff's style is quite abstract, and to ensure my designs are 'fitting' with theirs, I will refer back to my Kirchhoff mood board for ideas and themes they use.

 I am really excited for this new project, as it is only a week and two days I will try to keep on time with workload and make sure I have plenty of research to work from. My main worry is that the collection we design could look too similar to their previous work, so to avoid this I will make sure I keep referencing back

Sunday, 26 October 2014

Structure and Attachment | Final Thought

As a final thought, after looking back through my gallery sketchbook, I noticed I had been to two 'Wool' exhibitions in the past month and a bit, and I enjoyed the knitwear workshop so much that I have decided to incorporate knitwear into my final garment. Both exhibitions were extremely inspiring in terms of textile, but I hadn't previously thought of incorporating.

As well as this initial thought, I decided that the coat looked interesting worn both back and front at the front, however if the large teardrop hole was worn at the front, layers would need to be added. This is how I am hoping to incorporate my knitted layer. From my illustrations, this idea can actually be seen worked into a leggin/stocking style, the layered 'honeycomb' effect, which is softer than just a plain knit. It will hopefully help bulk out the coat and keep its structure strong.

As this is a last minute risk, I hope it adds texture and interest against the harsh look of the structured leather. I will not 'officially' include it as part of the garment, but instead as an accessory. Luckily I have a large piece of red knit I have previously made as originally I thought I would make my garment out of knit. This is a great way to link in my interest in knit into this project, and will hopefully improve my skills in knitwear and improve my final garment as a whole.

Structure and Attachment | Final Garment, The Making


The making of my actual final proved to be quite stressful, I encountered many problems with my fabric, unfortunately as it was a heavy fabric it was really difficult to work with. This ended up breaking 4 needles on my sewing machine, and many trial runs. In hindsight, I should have bought two fabrics and done test-run's on both to see which worked better.
The fabric's thickness first became an issue when attaching the sleeves, after my previous mishap on my toile of attaching the sleeve inside-out, I was extra careful with my final. The sewing machine took a few attempts at getting through the fabric, and I started to get really frustrated. Because of this, and due to my decreasing needle's I decided to step back from the making and focus on other parts of the project to collect myself.

My main issue was with how heavy the neck was, once the fastenings are added this hopefully shouldn't be such an issue. Originally I designed the coat to have over-sized buttons, but after going back through my designs I thought that dainty would work better. The design is so structured and unfitted that I felt it needed something smaller and more feminine to pull it together as a conceptual womenswear piece. After the fabric dilemma, I decided on buying two fastenings so that I could chose which one I wanted, hooks and eyes or lace up with embroidery thread.

- without the Shoulder piece or fastenings

I made a few examples of what the shoulder piece could look like out of my fabric, and played around holding them against the basic frame of my final garment. As the fabric was too thick I couldn't actually pin them onto it which was annoying, but instead I used tailors chalk and marked out where they could go. This worked well, and was an easy way around the fabric problem. 

Despite all the problems I encountered during the making, I actually have really enjoyed making something that is completely my own, with my own chosen fabric. I am so excited to shoot this piece. I don't want anything complicated for the shoot of this, as I feel it's interesting enough to hold it's own. Any inspiration will be taken from my previous shoot, this will include the make up and the hair. I don't want any props and I want the backdrop to be stark and white. Taking Horst into consideration, I hope the final images are structured and bold, with clear lines and interesting negative spaces.


Friday, 24 October 2014

Structure and Attachment | The Toile

As previously mentioned, my pattern cutting knowledge is severely lacking, so I sought help from Declan, a previous Ravensbourne Student who also had a Btec in Pattern Making. I showed Declan my final designs and he helped me create them onto pattern cutting paper. I was really worried about the actual making of the garment so Declan's help was extremely useful and took a huge stress off. In future, I really hope to be able to pattern cut to his standard as he was so talented and a great inspiration to me.

I decided to make a toile first so that I could make sure I liked everything and that it was how I had envisioned it. 


My first challenge was the sleeves, as inspired by a kimono they had to be oversized, but to relate to structure the calico wasn't strong enough so I had to starch it. Although I knew I would be using a stronger fabric than calico, the starch gave me a better idea of how the fabric would hold against the body and more of a feel of what it would look like. My next immediate challenge was attaching the sleeves to the body. I had no idea how to do this, so it was quite a lot of trial and error. Fortunately I worked it out and attached both sleeves, but in my stress I accidentally didn't turn one sleeve the right side out so the seam showed. Through making a mistake like this, it taught me that I need to be more careful for the final product, and which way to sew the fabric together.  

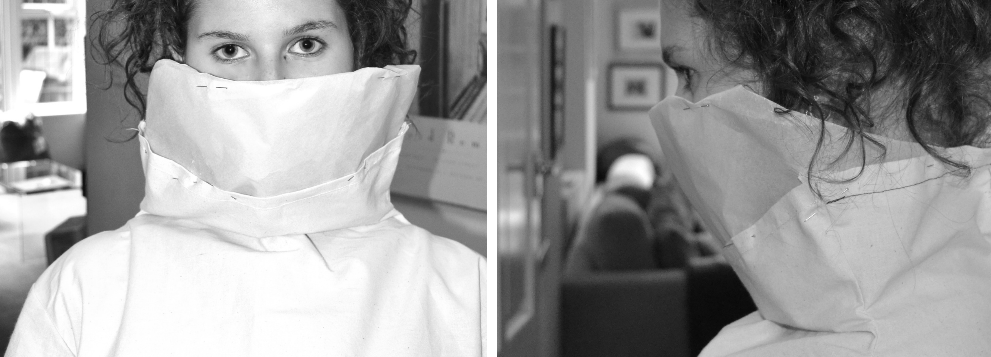
The first problem I encountered with the pattern was the size of the sleeves against the hole in the main body, however this was extremely easy to fix. I simply added 2cm to each side of the sleeve to ensure there was no tightening of the sleeve in the final. My other alteration I decided on was the neckline. I wanted the neck be high enough that it sat just under the eyes. So using my toile and some pattern making paper, I played around with height until I got the desired effect. I decided to curve it round instead of having the neck as the same height front and back, with an extra 12cm on top, 6cm on each side and 3cm extra at the back.


Finally, to incorporate what I saw at the V&A, in both the Asia sections, Horst and the Wedding Dress Exhibitions, the immediate response was an armor embellishment, like those seen in the Samurai section in the Japanese exhibit, but also with the structure of Blow's hat, and the avant garde nature of Horst's photographic style. This is where my paper work came into play, I used my paper from my mannequin work to place in various places around my coat, but finally decided upon one shoulder, which can be seen in the first two pictures.


I am extremely excited to see how this works in my fabric, which I have now chosen. It is, of course, red, bringing the Autumnal colour palette into play. As I need structure in the garment, the fabric had to be strong, I narrowed my fabrics down to three; burgundy wool lined with interfacing, burgundy patterned faux leather and red faux leather. I decided the faux leather was more striking, and I decided on the brighter red purely for the shock factor, much like the red wedding dress.


Tuesday, 21 October 2014

Structure and Attachment | A Trip to the V&A

I visited the V&A again for final inspiration, as I am a member I decided to see the Horst and the Wedding Dresses Exhibitions. I felt I got a lot from these two spaces, and they pushed my design to a higher level.

Horst

This exhibition was beautiful, the dresses were structured and his photography gave me so much inspiration on how to shoot my final garment. The elegance of his photography mixed with its modern approach brought a new twist to my Asian inspiration idea's. The beginning of his work was all black and white, with shadows and angular silhouettes, which reminded me of the striking Geisha make up inspiration to my accessory. He creates such romance to his photography, which I love but still keeps it contemporary. 

The way Horst uses composition and sketchbooks was really interesting to see, his designs for his photoshoots were so similar to how I originally draw sketches, so I really engaged with his work. The rough nature of them was such a jump to the final finished product it really encouraged me to create a flawless look with my project.

His later work with vogue relates better to my idea for my final piece. The pop colours along with the modern angles of the big sunglasses and striking make up is something I hope to take to my garment. And especially include in the photography aspect. Horst helped me to visualise the garment on the human body, as opposed to just on the mannequin, a skill I needed to practice. I felt this exhibition really helped me move my piece from simply a design to a garment.

Wedding Dresses

The Wedding Dress exhibition inspired my chosen fabric for my final garment, there were two wedding dresses that really stood out for me, the indian silk gown; for it's Asian inspiration and of course colour. And an extremely simple button up wedding dress, in the most beautiful deep red with a clinched waist.

Although I am not making a dress, the detailing of the dresses gave me ideas of what to to with my final. The main inspiration I took from this exhibition was a gold head-wear by Selina Blow, I immediately thought of the Chinese triangular straw hats, I made sure to get a picture of this and sketch from it as soon as I left the exhibition so I wouldn't forget it. The structure of this hat was so interesting, but yet remained elegant, I hope to incorporate this idea into my piece somehow. 

Monday, 20 October 2014

Structure and Attachment | Mannequin Work

After the Accessories and Styling/Photography weeks, I decided to use my ideas and incorporate them into my final designs.


I designed 6 details in a structured kimono style coat, which is my garment of choice. I decided on outerwear as a final garment as we are designing for Autumn Winter and the season is all about layering. Following on from earlier designs the structural necklines and silhouettes were my greatest inspirations. After my neck piece, I wanted to focus on the neck of the outer wear, so therefore using the structure of a kimono with it's high neck seemed appropriate.

Following this thought process I had to work out how to physically create a 'neck' with structure, so I moved from paper to mannequin. To start off, I was trying to work out how to create a simple neck 'collar.' I used calico, and used a simple dart pattern that I made up.

Displaying photo 1.JPG

From this initial design, I used pattern paper, brown paper and calico to add various neck structures as experiments. 

I actually found this work really hard, and got really worked up and upset with it, because I had so little experience I found it really frustrating not being able to do what I wanted with the material. However, after a quite 1-to-1 with one of my tutors Sarah, I calmed down and pulled myself together. Sarah seemed to think I had quite a natural flare with the mannequin work, which was encouraging and I felt more confident with continuing working on my designs.

Although the mannequin work was successful, transferring these designs to a pattern would mean I would have to design a pattern that 'grew' at the neck, something extremely advanced. I spent the rest of the day sewing and experimenting onto my mannequin at home, and manipulating the paper in different ways, this was very useful to the development of my designs to final product.